
There are two ways to make your own concrete countertops, pour in place and pre-cast.
Pour in place is exactly what is sounds like. A supporting mold is created to hold the concrete. After it's mixed, it is placed into the mold. Then the piece is finished in place.
Pre-cast countertops are produced in mold, generally in another location and put into place after they are finished.
Pre-cast generally require less finish work since the mold can be made of smooth melamine coated particle board. The concrete will take on the smooth texture of the board.
Pour in place pieces can be troweled fairly smooth by hand, but the work piece usually needs to be ground smooth. (Often pre-cast is givien a final grinding session to produce the smoothest finish.)
The process
Reinforce the cabinetry - add plywood to the top and rear of the cabinetBuild the mold - constructed from melamine coated particle board
Add any features to the mold - use PVC pipe or foam to add holes for faucets, etc.
Caulk the edges with silicon - create a water tight mold and adds curved edges to the finish
Place the rebar - use wire to keep the rebar an inch from the top of the future countertop.
Mix the concrete - a concrete mixer is a must if adding color and makes it much, much easier.
Fill the mold - pack the mold by placing the concrete into the mold by hand
vibrate if you want - vibration eliminates voids - optional depending on the look
let the concrete set for 3-7 days
De-mold the countertop - carefully removed the mold with a prybar!
fill any voids - can be filled with concrete slurry
install the countertop - get help. it'll be damn heavy.
seal the countertop - use a sealant of choice.
enjoy.
The espresso bar
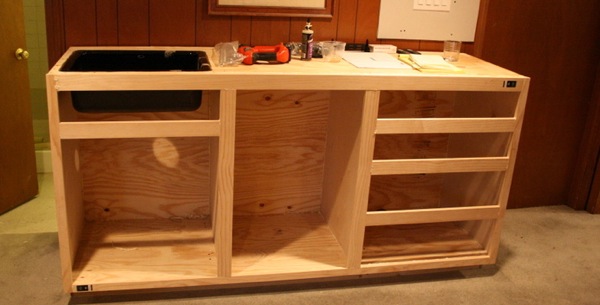
I built this cabinet to be extra strong. The side and center panels are 3/4" cabinet grade plywood. The top and base are both 3/4" plywood and the back is 1/2" ply.
My espresso pump will live under the sink, a mini-fridge in the center and drawers will provide storage on the right.
If you use existing cabinetry, you should add at least 1/4" plywood to the back and 3/4" ply to the top for the concrete to rest on. For my undermount sink, I routed an inset edge into the ply and added reinforcement below the routed edge.
I also pre-drilled the holes for the plubming to pass through as well as a hole for my espresso machine plumbing/power/drain.
The mold
Unfortunately I didn't document my mold. The process was time intensive, I was tired and I didn't want to get junk all over my camera.To make the mold, I purchased a sheet of melamene particle board. I had the store rip it down to the width of the bar: 24".
Since I wanted a 2" thick counter, I used my table saw to cut 2-3/4" strips from the remainder to make the edges.
To create a sink voide, I used some 2" strips and routed the ends to add rounded corners.
For the faucet holes, I used pieces of 1" pvc and scrap wood to provide for the limited mountning depth of the faucet hardware.
This is faucet dependent, so buy your hardware BEFORE making the countertop.
For the espresso plumbing, I used some 2" PVC. Each was sealed with silicon and screwed in place.
With the mold built, I layed out 3/8" rebar from the hardware store. I found the 48" and 24" pieces convenient. For the sink endge, I bent the rebar to surround the sink for strength.
The concrete
I used Quikcrete 5000psi concrete for my countertop. To color it, I purchased some Quikcrete colorant as well. To figure out how much concrete you need, first calculate the volume of the bar in cubic feet. Each bag will do about .75 cubic feet. Do the math and buy some extra!A rented concrete mixer made the concrete much easier to handle. Add the water, colorant and then slowly add concrete mix until to get a sort of cookie dough consistency.
With some safety glasses, rubber gloves and protective clothing, pack the mold with the concrete. When it's well packed, screed the top with a 2x4. (You can just use a trowel if you like)
demolding
After about a week, unscrew the mold pieces and gently pry them off of the concrete. Don't pry agains the concrete, but against the mold!Get some assistance to move the new countertop in place. I used some silicon sealant on top of the wood and tap-con style concrete anchors to hold the countertop in place from below.
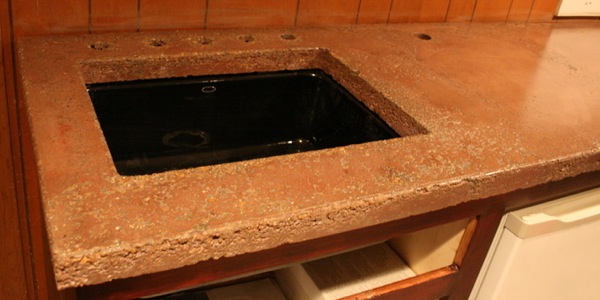
The edge of the sink was sealed with black silicon after installation.
To fill the voids, I used a mixture of concrete with some left over grey color. Then I worked it into the voids and wiped everything down with a grout sponge. The result is very organic/rock looking.
The countertop was sealed with the same tile grout sealant I used for my kitchen floor since I had it on hand. It does a reasonable job, but moisture will seep through it if puddles are left on it for very long.

My wife and I are both fond of the slighly rough texture on the countertop. Since it's only used for espresso production and a resting spot for dirty dishes that need to go upstairs, it's working out nicely.
Latest project
In order to improve a retaining wall on my patio, I build a mold and cast a bar height countertop in place. It required about 8 bags of concrete, which I mixed in a large plastic container with an electric drill mixing attachment.To polish the new countertop outside, I purchased a wet grinder/polisher and a set of diamond pads in order to get a smooth finish on the cast in place countertop.
About two weeks after I cast the counter, my grinder showed up. I ground it with 50 and 100 grit and got a fairly smooth surface.
Pictures and more details to come.