Biobug.org

Projects, notes, etc by Will O’Brien

Entries


My WishList
Resume
Want My Coffee?

Production

Photo Gallery
Articles
Podcasting
News

Amusements

Audio
Brewing
Cigars
Coffee
GPS/GeoCaching
Hacks
Home Theater
Kayak
Machine Shop
Photography
Recipes
SCUBA Diving

Research

CNC
CAD
Scripts
VR Interface
Environment
KarKomp
KarKompV2
MythTV

Reference

OWLNet
Quit Soda
Mac
Linux
Tech Ref
Panasonic Toughbook
Dreamhost hosting

Communication

Blackberry
T-mobile MDA
Danger Sidekick
WRT54G(s)

Transport

Land Rover
4Runner
Beetle
Jeeps
Motorcycles
EV Motorcycle
About
Links
Search

Tri/Quad Copter motor testing

15 May, 2011 (12:23) | Uncategorized |

Check out this sweet test rig that “Old Man Mike” built for evaluating motors for copters. It uses a PIC microcontroller to measure thrust, current, voltage and throttle to measure efficiency and wobble factors to find the best motors.

Test Fixture Evaluates Motors/Props/ESC for Quadcopter Performance from Old Man Mike on Vimeo.

Comparison of microcontroller dev boards

2 February, 2011 (09:51) | Uncategorized | 3 comments

Yesterday, Hack-A-Day had a nice write up listing the various development boards available these days for projects. If you’re looking for a brain for your next creation, you should definitely check it out. It includes boards that start at $4 and up.

Calibrate your monitor with your DSLR

31 January, 2011 (08:15) | Uncategorized | 3 comments

I upgraded my desk at home a bit with a new monitor – A Samsung P2770H – a pretty decent 27″ 1080P display. I was wondering how I might calibrate it and the pair of 24″ displays next to it to have reasonable color matching and ran across this article on doing the job with your digital SLR.

First off, this is a great idea. DSLR manufacturers put alot of time and money into color calibration. The main trick is to have a neutral grey to get things correct. There are some caveats for this: Using a neutral gray card will allow you to calibrate your colors to match the lighting/ambiance in the room. This could result in a funky calibration, but mostly due to ambient lighting and reflective surfaces. Your monitor doesn’t reflect color so you could get some odd results. However, you should end up with a decently balanced color wheel.

Server update: Goodbye and thanks for all the phish

27 January, 2011 (14:36) | networking | 1 comment

I shutdown my old virtual server today after migrating all my data…. Sorry if you got a short availability issue while DNS was updating around the internet.

I updated this server to a more recent version of my favorite Linux flavor: Ubuntu. The old system was running on a Slice that was built many years ago and ran just fine on Ubuntu 6.06.2 LTS. It had a good run, but since I was destroying one of my other virtual machines, I figured it was time to migrate. Here’s how I did it.

1)Built a new slice at slicehost – my favorite virtual machine vendor. I installed the usual things like Apache2, php5, mysql, etc. Then I copied my Apache2 site configs over and added the missing modules to make them load properly. After that a large scp transfer copied my data and I performed a dump of my databases to flat text and imported them into my new improved MySQL server. My new slice ended up in a different data center on new hardware:

10  abovenet-peer.chcgil01.transitrail.net (137.164.130.174)  22.218 ms  22.107 ms  22.106 ms
11  xe-0-0-0.er1.ord7.us.above.net (64.125.26.245)  34.977 ms  27.394 ms  24.189 ms
12  64.124.65.218.allocated.above.net (64.124.65.218)  23.406 ms  23.524 ms  23.524 ms
13  core1-ed1-edge3.ord1.rackspace.net (173.203.0.101)  24.545 ms  24.808 ms  24.535 ms
14  173.203.0.189 (173.203.0.189)  24.642 ms  25.373 ms  24.576 ms
15  biobug.org (184.106.65.132)  24.138 ms  24.182 ms  23.993 ms

Looks like a Chicago data center (and behind a Juniper MX router at above.net) for the new system. My new VM is likely on a faster CPU and I upgraded the ram while I was at it. The price of the new data center was a new IP address, so I was forced to update DNS for my sites that I maintain here.

Pleiades arrives in style

16 November, 2010 (14:53) | Uncategorized | 1 comment


I traded in my venerable Jeep Liberty for a new ride recently, a Subaru Tribeca. Subies are well known for their reliability and their AWD. The Tribeca is basically an overgrown outback – in fact the new outback looks alot like a Tribeca. After pondering my driving habits for a bit, I thought that an outback made sense. AWD, nearly 30mpg with a 4. Sadly, I just couldn’t stand to drive the 4 cylinder. Not after having a 6 in almost all of my previous cars.

This particular car has built in Navigation, rear DVD, etc. I picked up some IR headphones for it from Amazon for a paultry $12/each. They have auto off and sound pretty decent. I expect that I’ll be hacking the nav system a bit in the future. It’s got some annoying features and quite frankly, the brain behind the thing is a piece of crap in terms of usability. Example: to put in a destination that’s across the country, you must select the region, then input the address. The map data that came in the car is actually based on 2005 data sets. ugh. It’s truly a lazy programmer who can’t create a list of states and auto select a region of said states. I’m forgiving Subaru for the lame Nav system because I really, really like the car. (And I didn’t pay $4k to have it in my used car, unlike the poor sap who originally purchased the thing.)

Hey Subaru, need a consultant for the next gen nav system? That thing that Kenwood is sell you is horrible. My 6 year old Tom Tom is better than that!

Logic Analyser on MacOSX: sweet.

15 October, 2010 (09:52) | Projects, Toys | 1 comment

logic-analyzer

I finally picked up one of the SUMP project based Open Source Logic Analyzers that Ian worked on. It’s a pretty good deal from Seeed Studio. I wanted it to work on my Mac, which wasn’t too horrible, but it was a little annoying to dig through forum posts to figure it out. Even then, I thought that the instructions were a bit lame.

Here’s how to make it work under Snow Leopard(10.6.4):

Download the latest Arduino software and right click the application to view contents. Look under Resources/Java and you’ll find RXTXcomm.jar and librxtxSerial.jnlib.

Copy those two files to /Library/Java/Extenstions on your Mac hard drive.

Download the latest SUMP application from: http://www.sump.org/projects/analyzer/

I used: http://www.sump.org/projects/analyzer/downloads/la-bin-0.8.tar.bz2

Uncompress that and toss it in your Applications folder. Now you should be able to doubleclick analyzer.jar (which is inside the client folder of the thing you just uncompressed)

Now open /Applications/Utilites/Java Preferences. You need to make 32bit the preferred launcher for applications. Look at the lower list that says:

Java SE 6 64-bit

Java SE 6 32-bit

Now drag the 64-bit one so that the 32-bit is first in line. Close the Java Preferences Utility.

If you’ve done it right, you’ll be rewarded with an application window. If you messed up, the app will open and immediately crash.

iPad blog power…

16 August, 2010 (21:25) | Uncategorized | 2 comments

I’ve finally gone the iPad route. It’s surprisingly handy during conference calls and it’s great for slipping into a motorcycle jacket. It’s not a laptop replacement, but it’s great for in between stuff. Major faults? No printing, no camera. I don’t care about video as much as document capture. I’d like to see it augment my iPhone better… Share the dang Internet connection and perform local file sync… Photos etc.

next for motoKomp: garage door control

29 July, 2010 (23:14) | Uncategorized | 3 comments

Here’s a really simple way to add a garage door opener to your motorcycle.
Unfortunately, it’s a bit limited. I don’t run around with my high beams on all the time. So we’ll use a microcontroller to watch the high/low beam switch. When it toggles a couple of times, the atmega in motokomp will activate the opener. I just ordered a new remote for it. When I pull the computer for the new mod, I’ll be releasing hardware specs, code, and work up a light weight version that doesn’t burn a full arduino for people who just want to get their speeds corrected.

New gauge mount for MotoKomp

26 July, 2010 (09:24) | Uncategorized | 1 comment

Rebuilt gauge mount
I had some fitment issues and some loose screw issues with the old gauge mount, so built a new one. This one has three machine screws mounted through the rear case and a 6061 aluminum bracket that was hand bent and riveted by yours truly. While I was at it, I added a plastic mounting plate for the Arduino and added a mounting stem for the LCD display below the gauge cluster itself. I still need to add some waterproof casing, but now the usb port is easy to get at and the gauge cluster appears to be in the perfect position.

Note to self: loctite destroys ABS plastic. I’ll probably have to pick up another casing for the Gauges – but the upper was pretty crappy anyway. I may machine an entire new case for it this winter.

MotoComp – My DIY “speedohealer”/motorcycle computer

30 April, 2010 (09:40) | Motorcycle, News, Projects, Projects, Uncategorized | 4 comments

This is my latest hardware project: MotoComp. It’s based on some work by [Bill2009] but I’ve been extending and reworking the code quite a bit. I installed gauges from a 2004ish Honda CBR 600 on my 1993 CBR 600 F2. Typically, this conversion uses a $125 product called “Speedohealer” to adjust the output of a retro-fitted speed pickup to make the speed output accurate.

My goal is to replicate the functionality of a Speedohealer (which is a very mature product, and worth the price if you need it) and add some features while I’m at it.

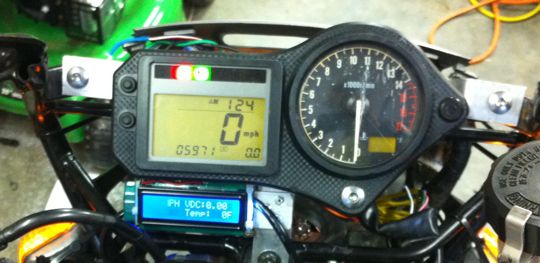
I’m working on for my F2. As you can see, the display will show MPH, Voltage, Ambient air temp and the current gear. The hardware is an Arduino, protoshield, DS1820 temp sensor, a transistor to handle output to the speedometer, some voltage dividers and a cap or two for filtering signals.

Gear is calculated based on the ratio of the engine RPM to wheel RPM.
MPH is calculated based on tire diameter and wheel RPM.
Temp is measured using a one-wire temperature sensor. I added it because I had the hardware sitting around.
Voltage is directly measured on the bike. Given the history of R/R/Stator issues, I find having the voltage on a display to be really, really handy.

Right now I’ve got the system mostly working, I’m just working on dialing in the speed sensor/healer functions. The cost to build one like this is about $50 for prototype parts, I’ll likely reduce the cost one I have a production design worked up.

« Older entries

 Newer entries »