Biobug.org

Projects, notes, etc by Will O’Brien

Entries


My WishList
Resume
Want My Coffee?

Production

Photo Gallery
Articles
Podcasting
News

Amusements

Audio
Brewing
Cigars
Coffee
GPS/GeoCaching
Hacks
Home Theater
Kayak
Machine Shop
Photography
Recipes
SCUBA Diving

Research

CNC
CAD
Scripts
VR Interface
Environment
KarKomp
KarKompV2
MythTV

Reference

OWLNet
Quit Soda
Mac
Linux
Tech Ref
Panasonic Toughbook
Dreamhost hosting

Communication

Blackberry
T-mobile MDA
Danger Sidekick
WRT54G(s)

Transport

4Runner
Beetle
Jeeps
Motorcycles
EV Motorcycle
About
Links
Search

Add a 3rd eye: ATC3K to Goggle Cam mod

19 May, 2009 (09:31) | Projects, Toys

Finished goggles

Before my last ski trip I wanted a helmet-cam. I bought an Oregon Scientific ATC3K digital video camera, but the mount was just too bulky for a helmet rig. It’s great for mounting on a kayak or mountain bike, but totally unsuitable for a real helmet mount. (It’s just too big.) Obviously, it was time for a bit of modding.

Parts & Tools:

  • Soldering iron
  • De-soldering iron
  • Dremel (rotary cutting tool)
  • Small screw drivers
  • Oregon Scientific ATC3K Video Camera
  • Ski goggles
  • AA battery box
  • IDE hard drive cable
  • Small plastic case

Take the camera apart


Start by disassemble the camera. Unscrew the back cover and
pry off the rubber from the lens end. Remove all of the exposed screws
and pop open the battery cover. Unscrew the rear cap and remove the
batteries.

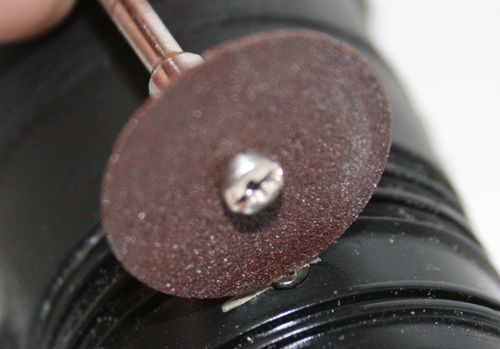
You’ll have to cut slots into the two security screws in
order to use a normal screwdriver on them.


If you’re lucky, the battery tray and camera will slide out of the
body of the camera now. If it’s too stubborn,  you may have to cut the
body of the camera in half to help things along.

De-solder the camera board

The camera is mounted to the main board by ten pins on either side of the main board. Grab your soldering iron and add more solder so that on each side a large bead of solder covers all ten pins. Use your soldering iron to heat the entire bead. Once it’s melted, you can partially pry the camera board from the main board. Repeat the process on each side until you can remove the camera board entirely. Be patient and give the camera board time to cool down in between heating sessions. Once the board is free, de-solder the entire connector and remove any excess solder from both boards.
Add the ribbon cable to the camera board


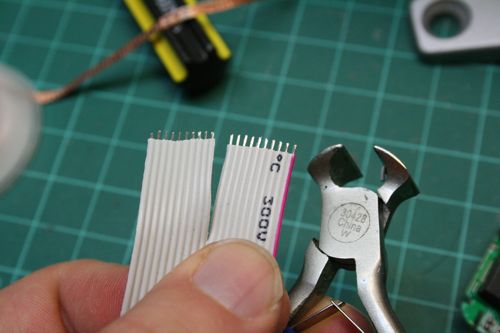
Grab an IDE hard drive cable and cut the longest piece out of it that you can. Now peel off a piece of cable that has 20 wires in it – preferably with the red mark to make wiring it up easier later on. Strip about 2mm of wire at the ends and cut them flat.

Now solder the leads to the camera board, where the old connector was.

Repeat the process to complete the remote cabled camera board.

Now we’ve got a nice, easily mountable camera. This should work for various different build ideas: helmet mounts, custom enclosures, embedded motorcycle cams…

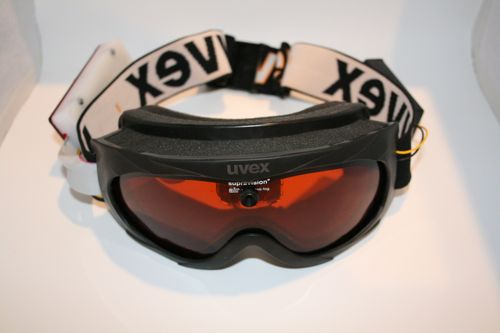
Mount the camera and microphone


Locate the camera on the lens and drill a hole through the lens of your goggles. Blow out the dust with a can of compressed air if you end up with debris inside the double lens. Position the camera and use hot glue to permanently mount it to the inside of the goggles.

Now route the camera ribbon cable along the edge of the goggles and out through the strap mount.

On my goggles, it was easy to pull the ribbon cable through the hole for the strap.

Mount the Microphone

Re-use the microphone from the ATC3K and add some new wires. The soft wire from some old headphones will help isolate the microphone from vibration noise. Pull the end of the audio cable out the side of the goggles where the
strap attaches.  If needed, mount the microphone on the bottom of the goggles with a small amount of glue.

Wire the main board


Trim the ribbon cable to length and solder it to the main pc board
where the camera originally mounted. Use the red marked cable to make
sure you connect the correct pins. Attach the microphone wires and a pair of wires
that are long enough to reach the far side of the goggle strap.
Running power

Pull the power leads through the goggles so that they will be out of
the way. Run them out the far side of the goggles and connect them to
a replacement AA battery box.

Originally I wanted to use AAAs, but I found that AA batteries balanced the goggles better.
Enclose the main board

We want to protect the main board with something that’s removable and
waterproof. I made a custom enclosure on my computer controlled mill,
but a simple plastic bag with tape will suffice in a pinch. In the final build, I mounted the control buttons (seen behind the red acrylic) on top of the acrylic with some hot glue.

The body was milled from two pieces of polyethylene cutting board.

The cover was milled from some acrylic I had left over from some laser cutter projects.

I thought about some complicated mounting tricks to attache the boxes to the straps, but found that electrical tape worked great. Keep in mind that the cold will drop the voltage on your average alkaline batteries – get some of the lithium AAs or the camera will keep shutting down.

Hit the mountain!


Have fun carving the slopes.

«

  »

Comments

Pingback from Goggle camera mod – Hack a Day
Time: May 19, 2009, 9:45 am

[...] submitted his skii goggle mod. He has mounted an Oregon Scientific ATC3K digicam in his goggles. This should make recording skii trips a lot easier. Most of the electronics fit just fine in the [...]

Comment from Marc Daigneault
Time: May 19, 2009, 9:56 am

Hey Will,

Great work! Awesome idea, very well built and documented.
Hoping to see some sample video in the future. Will keep you bookmarked!

Marc

Comment from ksch
Time: May 19, 2009, 9:59 am

Great mod, congratz. I would like to have one too… maybe you can show us some vid or pictures taken with it :)

Comment from John
Time: May 19, 2009, 10:28 am

It will be interesting to see the footage.

Comment from Jared
Time: May 19, 2009, 10:54 am

No video?

Comment from William J Sisti
Time: May 19, 2009, 12:01 pm

What if i just send you my googles. How much would you charge?

Comment from superstoker.com
Time: May 19, 2009, 2:21 pm

any video on this? great idea btw

Comment from Strawp
Time: May 19, 2009, 2:22 pm

Nice! I have the mask and a camera but it’s only a 2K which means no IR control.

Also the complete lack of skill on my part :P

Comment from Ian Lee
Time: May 19, 2009, 2:25 pm

Very cool! Any problems with snow getting in the lens? Any thoughts on a cover here or maybe even just mounted inside the goggles for a real first person point of view?

Comment from Todd
Time: May 19, 2009, 2:52 pm

Cool mod. Any worries about getting moisture on camera board? Did you consider sealing the camera board in something like epoxy or hot melt glue?

Comment from Zorg
Time: May 19, 2009, 3:56 pm

Since you’re wearing a helmet, why didn’t you simply attach the original camera to it !?

Comment from Montag
Time: May 19, 2009, 8:55 pm

This article useless without video!

Comment from marcello
Time: May 20, 2009, 4:07 am

Footage!
Footage!
Footage!

:D

M

Comment from eric
Time: May 20, 2009, 10:39 am

I have heard that lithium batteries are among the worst for performance when used in colder settings. I have not seen specks for alkaline but I would recommend NiMh, plus they are cheaper.

Comment from nuxdie
Time: May 20, 2009, 10:47 am

awesome job! _)

Comment from carlo
Time: May 20, 2009, 4:32 pm

Nice job!
i want to do the same for flying on my delta trike! I don’t like a fixed camera as i want to show what i am watching from above!
Any footage?
Carlo

Comment from shane
Time: May 28, 2009, 10:07 am

How the hell are you meant to turn it on and off? and change settings? know its recording? otherwise it would be a great mod..also what about the noise prob/wind noise that is, would it be easy to upgrade the mic for better sound?

Comment from Action Adventure
Time: July 6, 2009, 4:53 am

Great Job! Waiting for the mass production!

Pingback from Home Made Ski Goggle Cam Works Perfectly Well | Skiing Info, Tips, Reviews
Time: September 10, 2009, 7:51 am

[...] So, Make contributor Will O’Brien figured out a way to mount a ATC3K camera into his skiing goggles. Here’s the whole story of how he did it. [...]

Pingback from Home Made Ski Goggle Cam Works Perfectly Well | Homeboy Ski Blog
Time: October 18, 2009, 11:13 am

[...] So, Make contributor Will O’Brien figured out a way to mount a ATC3K camera into his skiing goggles. Here’s the whole story on how he did it. [...]

Comment from Ben Smith
Time: April 16, 2010, 8:11 am

Hey I was wondering how big is the board with the camera itself. I can’t see anything in the build pictures to estimate how small it is. Way to go on the modding, its the same idea I have come up with.

Comment from cloud computing video tutorial
Time: August 8, 2011, 3:54 pm

I’m impressed, I must say.

Comment from amish tours lancaster pa
Time: August 8, 2011, 3:56 pm

Rarely do I encounter a blog that’s both educated and entertaining, and let me tell you, you might have hit the nail on the head. Your idea is outstanding; the difficulty is something that not sufficient people are speaking intelligently about. I’m very happy that I stumbled throughout this in my search for info referring to this.

Comment from Maximina Shrier
Time: August 20, 2011, 6:28 pm

Hi! After study a few of the blog posts on your website now, and I truly like your way of blogging. I bookmarked it to my bookmark website list and will be checking back soon. Pls check out my web site as well and let me know what you think.

Comment from Chezwik
Time: September 14, 2011, 11:49 am

Thanks for the pictures and the idea. i was thinking about incorporating something into the goggles, and helmet cams just feel cumbersome to me, so i think i might just have to do something similar with a bit of personal customization. Thanks though, and awesome idea.

Comment from Winston Szmalc
Time: October 1, 2011, 7:15 am

Thank you for all of your efforts on this website. My mom take interest in doing research and it is obvious why. A lot of people notice all relating to the powerful form you offer both useful and interesting guides through the website and therefore invigorate response from visitors on that area of interest plus our favorite princess is in fact studying so much. Enjoy the remaining portion of the new year. You are always doing a wonderful job.

Comment from buy cheap gucci handbags
Time: October 11, 2011, 8:42 pm

I think that is among one of the most critical information for me. And i am glad reading through your article.

Comment from News Gadget
Time: October 17, 2011, 5:36 am

Wonderful learn, I simply handed this onto a colleague who was doing some research on that. And he truly bought me lunch as a result of I discovered it for him smile So let me rephrase that: Thanks for lunch! Anyway, in my language, there arent much good supply like this.

Comment from Médium
Time: January 13, 2012, 2:42 pm

Vous devriez visiter mes sites de voyance …

Comment from Ocampo Kenjie
Time: March 30, 2012, 2:19 am

The greatest online shop for winter sports and everything ski related. From ski to snowboards to boots to bindings as well as of coarse all of the winter appeal you will need to make you next skiing adventure the very best it could be. The best equipment is available here at the very best prices.

Comment from ipod touch 4g cases
Time: July 29, 2012, 4:09 pm

I tend not to comment, however I looked at a great deal of remarks on this
page Biobug.org

Comment from Adam Luangamath
Time: September 15, 2012, 10:33 pm

Nice blog right here! Additionally your web site quite a bit up very fast! What host are you the usage of? Can I get your associate hyperlink for your host? I want my site loaded up as quickly as yours lol.

Comment from joe
Time: January 29, 2013, 4:27 pm

im wearing white socks but does it matter no

Comment from charlieday.net
Time: April 19, 2013, 9:41 am

This specific blog, “Biobug.org

Comment from officialseasilver.com
Time: April 19, 2013, 3:49 pm

Exactly what seriously encouraged u to write “Biobug.

org

Comment from http://www.markwahlbergyouthfoundation.org/
Time: April 19, 2013, 6:10 pm

Exactly how long did it require you to compose “Biobug.
org

Comment from http://officialsayyesweddingdresses.tumblr.com
Time: April 21, 2013, 2:40 pm

Where did you actually get the suggestions to publish
““Biobug.org

Write a comment