My bout of bathroom insanity
While my wife was out of town for a week, I decided to finally install the new sink she’d bought (last year). I’d been putting it off for a while: I suspected that the project snowball – and I feared being without a bathtub with two kids. I was right….
I spent a couple of hours cutting the pipes (They avoided using valves in 69.) and gutting the old sink. To make up for the thinner granite top, I whipped up some 3/4″ wood spacers for the top of the cabinet. Then I used some sealant to mount the whole thing. Once I’d accomplished that feat, I decided that the 1969 gold flecked linoleum floor was too damn ugly. With that in mind, I picked up some tile and a new wax toilet seal…
Tally: 1 granite vanity, 1 new faucet, 2 valves, 2 hoses, 1 drain pipe.
Upon removing the old floor covering, I found some lovely rotted sub-floor in between the toilet and the bathtub. Luckily, my house has two layers of 1/2″ ply. I only had to replace the upper piece. After facing that bit of nastiness, I got a little crazy.
Tally: $5 of 1/2″ ply, 8 screws.
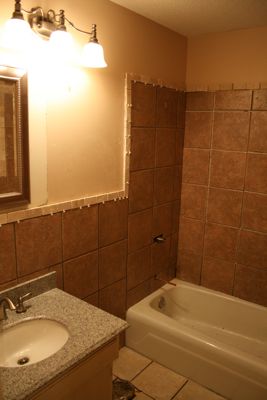
Why not remove the nasty old molded plastic shower liner that was installed over the original tile? I wanted to make sure that all the mildewed crap was out of there. So I did… and then I had to face the fact that I’d have to re-tile the entire bathroom!
Victim: crappy old shower liner
Since I was in demo mode, I went ahead and knocked out the bit of wall surrounding the bathtub faucet. With that out of the way, I called around and found out that Ace Hardware had fixtures starting at $50. I bopped over there and ended up dropping $110 on a brushed nickel unit and the bits of copper I needed to make it happen. Upon return, we (my boss came over to help) sliced out the old faucet and reconstructed the plumbing. Then we put down a couple of sheets of hardibacker concrete board.
Victim: tile, plywood backer from some previous plumbing repair.
Tally: $105 faucet, $10 in copper bits, $10 backer board.
I made a few different trips to acquire tile. My initial trip involved 25 square feet of heavy porcelain tile for the floor. My second trip involved 100 square feet of a lighter brown/reddish porcelain tile fot the walls. My final trip was to acquire some sort of edging for the transition from the wall tile to the walls. I’m fairly proud of the trim – I found some 2″x4″ tumbled stone tile that was made for floors – it comes preset on fiber mat for easy layout. I bought six square feet with 5 linear feet of trim in each square foot. For the entryway, I decided to add a marble threshold.
Tally: $8 in marble, $50 in floor tile, $150 in wall tile and $50 in trim tile, $20 in tile adhesive, $2 grout sponge, $12 in grout and $10 in tiling tools and a pair of $3 buckets.
Once the floor was restored to its former plywood glory, we laid down some cement backer board. This stuff reduces shifting and provides a perfect surface for tiling. With the board in place and all of the surfaces prepped, I spent an entire day – 8am to 6pm tiling the bathroom. I only stopped once in a while to eat a slice of pizza or drink some coffee. I started by tiling the edge of the floor along the walls and the bathtub. Then I worked on the walls from the bottom up. With one wall done, I moved to the bathtub surround. After that, it was on to the wall with all of the plumbing and above the sink. With 85% of the walls done, I laid the last six floor tiles in the center and quit for the day.
I had some friends coming over, so after my marathon tiling day, I mowed the lawn, swept the floors and cleaned the kitchen. After that, my friends showed up so I relaxed and enjoyed some wine.
The next day I hit Lowes again during lunch to return some odd tiles and grab five more wall tiles to finish the project. While I was there I found the trim tile I mentioned earlier.
Later that day I decided that I needed some 1/4″ ply to support the border along the edge of the old tile. I headed to Home Depot and grabbed the tile. In a fit of spending rage, I picked up a new medicine cabinet too. Then I stopped at Lowes again to get some non-crappy decora light switches. I also scored a new light fixture to round out the remodel.
Tally: $3 plywood, $130 medicine cabinet, $50 light fixture, $10 switches/etc.
So, $5 of 1/2″ ply, 8 screws, 1 granite vanity, 1 new faucet, 2 valves, 2 hoses, 1 drain pipe, $105 faucet, $10 in copper bits, $10 backer board, $8 in marble, $50 in floor tile, $150 in wall tile and $50 in trim tile, $20 in tile adhesive, $2 grout sponge, $12 in grout and $10 in tiling tools and a pair of $3 buckets, $3 plywood, $130 medicine cabinet, $50 light fixture, $10 switches/etc later I’ve got a fairly decent looking bathroom. The cabinet and walls will get a new coat of paint, we still need to grout all the new tile and I need to trim the bottom of the door to fit over the new threshold.