Biobug.org

Projects, notes, etc by Will O’Brien

Entries


My WishList
Resume
Want My Coffee?

Production

Photo Gallery
Articles
Podcasting
News

Amusements

Audio
Brewing
Cigars
Coffee
GPS/GeoCaching
Hacks
Home Theater
Kayak
Machine Shop
Photography
Recipes
SCUBA Diving

Research

CNC
CAD
Scripts
VR Interface
Environment
KarKomp
KarKompV2
MythTV

Reference

OWLNet
Quit Soda
Mac
Linux
Tech Ref
Panasonic Toughbook
Dreamhost hosting

Communication

Blackberry
T-mobile MDA
Danger Sidekick
WRT54G(s)

Transport

Land Rover
4Runner
Beetle
Jeeps
Motorcycles
EV Motorcycle
About
Links
Search

O-scope fun fun

1 November, 2008 (22:48) | Toys |

I’m finally getting around to replacing my long lost oscilloscope. If you’re hunting for one, ebay has a great selection. Here’s a rather nice intro to the used scope market
. I decided to hunt for a tektronix since they’ve been around for so long. The 465 series appears to be a great choice, but then I discovered a the 7000 series. These things have optional plug in modules that will make this older scope deal with ghz bandwidth or even become a spectrum analyzer. Of course, the mainframe design means that they’re pretty damn big, but this isn’t an issue in my workshop.

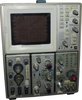
I picked up a 7633 complete with a few modules for half the going price of a 465. It should be interesting to check out when it shows up. The 7633 was released in 1970 and wasn’t replaced in the model line until 1990. It’ll do 100Mhz out of the box, and with three module bays, you can feed it six traces if you like. The scope can even export waveforms to a PC (hopefully via serial). These are considered to be very high quality, but just don’t get the love that the 465 does, probably due to their monster size.

They sold out! More RGB keypad bezels at SparkFun… soon

22 October, 2008 (23:33) | Uncategorized |

Spark Fun sold out of the first batch of keypad bezels I made. They’ll have another batch once I get them shipped of. By the way, shout out if you’ve put one together, I’m looking forward to hearing about it.

Sweet little firewalls

22 October, 2008 (22:09) | Toys | 2 comments

I’ve been spending most of my week in training for netscreen firewalls. We’ve been using quite a few of the inexpensive SSG5 units (along with a few big hairy ones in the core network) to deploy all sorts of VPNs, firewalled networks and various network builds. These little boxes are quiet (no fans), small and really, really flexible.  If you’re cheap and have a spare box, Devil-linux rocks, but if you don’t mind spending a couple hundred on ebay (or 6 ish new) you can pick up a sweet little box that’ll do everything from VPN tunnels (policy based or routed!) to running transparently on a network.

Easy fix for crappy Arduino connections

20 October, 2008 (10:00) | Uncategorized |

I spent some time putting together a LCD interface to test out an old 2×16 LCD I had laying around. Sadly, the LCD seems to have some issues – it would only write the first 8 bit block for some reason. (It could be a software tweak, but I doubt it at this point) However, I did notice that my Arduino was making pretty crappy connections to the wires since I started using shields with it.

Here’s the fix: break off some male headers to put into the I/O female headers. Then grab some jumper wire and strip the end. Make a small loop with some small needle nose pliers, then crimp the loop around the tip of the header that usually goes into a PC board. Once you have a few crimped on, grab your iron and solder the connections to get em solid. This makes pluging into a prototyping board easy and you can remove the Arduino from the circuit as needed without destroying the build!

Male headers are dirt cheap, so stock up next time you order some parts.

(I updated the timestamp to CST instead of GMT, it may cause problems…)

Ladyada’s Xport Arduino Shield

20 October, 2008 (08:44) | Uncategorized | 4 comments

Around the beginning of the year, I ordered one of Limor/Ladyada’s XPort ethernet shields for my Arduino toy box. I *finally* soldered it up and started playing with it.

The XPort is a pretty neat piece of hardware. It’s essentially an Ethernet to serial(ttl) bridge. You could use it to put a network interface on your home theater projector’s serial port, or in this case, give the Arduino a voice on the network that doesn’t require a server. That said, I would suggest writing web gateway applications that send commands to the XPort and keep the users away from it! I’d also put it on a private network or behind a firewall since it just uses telnet.

It took a few minutes to negotiate DHCP on my network. It was so long that I thought it might be defective. After that, I connected via telnet to it and set up a static IP. Now it starts pinging within a few seconds of power up. I also finally rescued my Decimilla from my door lock – now a boarduino lives in the door lock. Since I didn’t have a ttl cable to program the boarduino on hand, I just swapped the Atmel chips between them.

Now the question is what to do with it… I’ve got a few ideas:

Networked Thermostat controller

Networked, PID controlled, power managed espresso machine

Networked 1-wire interface controller

Both the thermostat or espresso mods will save me money and the world some energy so I’ll probably build both. I’ve got some Dallas 18S20 1-wire temperature sensors that I think I’ll go ahead and wire up to get things started. The espresso setup will require a thermocouple interface, but the 18S20 will be great for ambient temp sensing for the thermostat build.

Guess the hardware, get a prize

19 October, 2008 (19:52) | News, Projects |

 I picked up some new sample hardware to play with. The surface mount pads are freakin tiny, so I had to get creative to break out all the pins I need access to. I murded one pad with a piece of 24 gauge wire that put too much stress on it, so I pulled individual strands of copper wire from some cheap speaker wire. That stuff works great, and I didn’t screw up any pads during the soldering job.

If you can name the chip, I’ll send you one of my laser cut RGB keypad bezels – free in the US, or for the cost of postage if you live elsewhere on the globe. Comment away!  (only the first correct guess wins it) Oh, if you just want a bezel, you can buy them from SparkFun Electronics.

Hack job powerbook g4 repair

19 October, 2008 (19:46) | Uncategorized | 1 comment

desolderin time

My wife trashed the power plug on my old her 15 inch Powerbook G4. I cleared enough room on my workbench and finally got around to taking the thing apart. I desoldered the old power jack – I was pretty impressed at how well it held up. Unfortunately, it had pieces of old power plug in it and the contacts were pretty worn out. I didn’t have a decent replacement on hand, so I soldered in some speaker wire (It was the most robust thing I could find – and it fit through the tiny holes on the board with only minor trimming) then  I zip tied it to the DC in board. I’ll be adding some sort of break away connector later on, but for now, I just spliced the wires to the power plug and zip tied the thing together.

It’s ugly, but it works and it should be pretty solid for a while.  She’s been sans powerbook for a few months (I was busy and I have a spare laptop) so now every time I turn around she’s on the thing.

New recipe: Coconut Chicken Curry

19 October, 2008 (16:09) | Uncategorized |

I decided to try my hand at making Coconut Chicken Curry last night. It came out great. You can grab the recipe here. It was a bit spicy for my wife, so I made some sweet Lassi to go with it. (Hey, I can mix indian and thai food in my house if I want!)

Espresso Repair: Pressurestat

6 October, 2008 (17:51) | Uncategorized | 2 comments

I finally got around to replacing the pressure stat in my ECM Giotto this week. The hardest part was removing the old P-stat without small wrenches. I finally settled for using a crescent wrench on the pipe and a pair of channel lock pliers to grip the metal lower where it crimps around the body of the pressure stat. Ideally, you’ll need a pair of thin metric wrenches to remove and re-install a pressure stat.

Along with the pressure stat, I also replaced the lever gasket. I lubed everything with food safe grease (from chris coffee service) and swapped out the seal. Now the lever turns nice and easy – no more squeaks!

I had a couple of overpressure events after the replacement, but some quick adjustment took care of things. I also removed the divider plate that used to separate the boiler from the water reservoir. (mine is plumbed in now) Without the plate, the pressure stat is now reachable by simply removing the former reservoir cover.

It just occured to me that I now have enough room inside the body to mount either a PID controller or some other controller if I decide to do away with the pressure stat entirely later on. By hiding them under the cover,the classic look of the machine would be preserved – this was my major hangup in the past.

Just a few projects on my list…

23 September, 2008 (20:21) | Uncategorized |

I’ve been taking my version of a vacation from myself, but I’m getting revved up again. Just a few projects on my list:

EFI Yamaha Tripple 850.

Megasquirt the miata.

Balance and build the 1.8L engine for the miata.

Create a universal bluetooth console cable. (got some parts, playing with ideas)

Write my frickin book already.

Upgrade the power supply on my CNC mill.

Reorganize my workshop, again.

Fix the drywall in the basement, paint and re-trim the basement.

Run the extra speaker wires for the 7.1 system – they’re ugly right now.

Trim the monster trees in the back yard.

Grade for the new concrete patio and landscape the back yard.

Pour said concrete.

Build the new outdoor cooking area.

Build a shed for all the yard tools….

« Older entries

 Newer entries »