Biobug.org

Projects, notes, etc by Will O’Brien

Entries


My WishList
Resume
Want My Coffee?

Production

Photo Gallery
Articles
Podcasting
News

Amusements

Audio
Brewing
Cigars
Coffee
GPS/GeoCaching
Hacks
Home Theater
Kayak
Machine Shop
Photography
Recipes
SCUBA Diving

Research

CNC
CAD
Scripts
VR Interface
Environment
KarKomp
KarKompV2
MythTV

Reference

OWLNet
Quit Soda
Mac
Linux
Tech Ref
Panasonic Toughbook
Dreamhost hosting

Communication

Blackberry
T-mobile MDA
Danger Sidekick
WRT54G(s)

Transport

Land Rover
4Runner
Beetle
Jeeps
Motorcycles
EV Motorcycle
About
Links
Search

Mount a remote directory via SSH on mac with port and friends

28 November, 2012 (19:51) | mac | 1,148 comments


I played with a few broken gui deals and finally happened to find a great link for making this work (if you use homebrew)

However, I use MacPorts – I’ve been using it for a while on various macs. So…

port install fuse4x

port install sshfs

On my first try I had a fail to build. Looking at the referenced logfile, I had to agree to the xcodebuild license.

sudo xcodebuild -license

Scroll to the end and agree (if you do), then re-run the above commands to get things built.

Then, create a mount point. I made mine in my home directory.

sshfs user@domain.com:/dir mountpoint


Motherboard bios updating for fun and profit

26 October, 2012 (10:09) | hardware | 1,110 comments

My Gigabyte ga-z68x-ud3h-b3 was due for some updating. It was trivial to use QFlash to update to the latest Award Bios, but it took a little extra work to get it up to the new UEFI bios. Here’s how I did it.

Follow the bootable dos usb tutorial here.

Download the appropriate bios updater and unzip it on the flash drive you used.

Boot your machine. The bios update starts automatically. :)

Follow the boot/power instructions and enjoy your new bios.

OK, it’s really clean this time.

7 October, 2012 (10:15) | News | 846 comments

I was overjoyed yesterday when I pulled up my site and found that it had been blacklisted as an attack site. Yay.

After the last incident, I simply rebuilt the blog, but the new data suggested that the site had been compromised via a plugin that was still there from last time.

So, just to clean things up, I duplicated all my data to a virtual server I spun up just for the occasion and rebuilt the entire web server. It was time to do this anyway – the OS was a few years old and toward the end of the support cycle.

The blacklist turned out to be via Google – so I loaded up their webmaster tools and finally found the malware review link. Before submitting a request, I had the site scanned by several different security tools. Once I was satisfied, I put in the request. Happily, today it’s back off the blacklist. Thank you to the internet jerks who made sure I spent an entire morning rebuilding the server. It needed to be done anyway, but I would have preferred to kick it off in the background while I’m at work rather than on my precious Saturday!

Malicious link removed

17 September, 2012 (10:44) | News | 1,027 comments

It seems that wordpress picked up a nasty little malicious javascript. I’ve cleaned it out.

Details:

It was inserting text sidebars that I don’t use. More info here:

http://labs.sucuri.net/db/malware/mwjs-include-rebots?v5

CNC machine/robotic cable management

11 September, 2012 (08:35) | hardware | 887 comments

Since I’ve been building my mecha-shapeoko, I’ve been looking into parts that make the build really clean. If you recall the Happy Monkey snowboard CNC machine, it had some really nice cable management that kept the cabling clear of the machine during operation. With my machine going large scale, I wanted to get some. My initial searches turned up some horribly priced parts.

It turns out that the trick is to search for ‘Cable Drag Chain’ and you’ll find the inexpensive pricing that we’ve all come to know and love on ebay. I picked up some 40″ 10mm x 15mm for about $12.

Inventables is fantastic.

21 August, 2012 (09:35) | Projects | 4 comments

I’ve been building/making/hacking hardware projects for a long time. As I’ve done that, I’ve really benefited from online shopping for parts you just can’t find locally. Also, it’s hard for the guy at the store to wonder what the hell you’re doing with that thing that he can’t find in his catalog.

So, last year a company came up on my radar – called Inventables. I found their catalog to be interesting and even asked them about stocking bamboo for laser cutting. They were really helpful and got a price for me.

Recently I’ve been working on my Shapeoko based mill. I ordered it through Inventables. I needed some more Makerslide and they’d changed sizes for easier international shipping. I emailed them and they found some of the old stock for me! They even adjusted some quantities on my order and really went the extra mile to make sure that I got what I needed.

Seriously, these guys are really great to work with and purchase from. Also, they support open source projects like Makerslide. If you’re in the midwest like me, shipping times are fast!

Normally I don’t mention much about shopping, but these guys are doing a great job! Check em out next time you’re making something.

Smoker Hacking

14 August, 2012 (09:25) | Uncategorized | 3 comments

So it begins. I’ve acquired a Bradley Smoker.
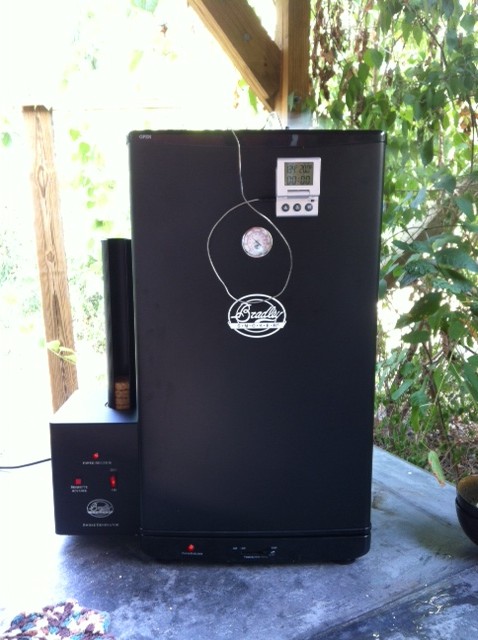
This particular unit is an interesting beast. It’s essentially a mini-fridge chassis (built for heat rather than cold). Up top is a standard grill smoke release hole, in the bottom is a undersized 500 watt heating element. Mounted on the side is the ‘Bradley smoke generator’. The smoke generator is actually very effective. A simple motorized slider delivers a preformed puck to a small hot plate. Once a puck is used up (timer based) it’s pushed off the hot plate by a replacement puck. The previous puck’s carcass is dropped neatly into a bowl of water – keeping the puck from reducing to ash. The heater control is pretty lame. If you’re not a modder, then consider the higher end digital controlled bradleys. They’re not much more online and look very nice. But we’re not here to talk about that…

So, I took a look at existing mods and quickly identified the primary needs.

1) Not enough heat. There’s enough coming off that element to make it work and keep people from burning their food. However, it’ll really suck to try to use on a cold/windy day. So, either add an additional heating element or a full on 900 watt element.

2) Temperature control – Adding a PID controller with SSR is the preferred method. Same tech I use on my espresso machine. Thermistors are a nice option – low component count.

3) Monitoring – We don’t want to open that thing very often. More information is better! Wifi and perhaps a custom rolled iphone app. I’ll use a pre-existing project as a base and tweak it for my needs.

4) Smoke control – I managed to over smoke some meats right out of the gate. They came out ok with some sauces, but I’m going to need the ability to dial it down. (Smoke for 3 hours, then cook for the finish…)


Parts list for this adventure:

Book Cover
Linksys WRT54GL – The linux modder friendly platform – with two ttl serial ports onboard, customizable linux distros for it and an existing project: Linkmeter – bbq monitoring platform.


Arduino
– yeah yeah, it’s quick and reliable. I’ll develop with a full on device and swap in a boarduino for efficiency after the fact.
Maverick ET-72 replacement probes These are thermisters in a nice food save enclosure. We’ll use them to monitor internal temps of food.

K-Type Thermocouple – We’ll use this to monitor the smoker temperature and use it to determine when to drive the heating element. This is a very effective method – it’s worked on my espresso machine for the last two years without failure.

Solid State Relays – A pair of these will allow the Arduino/router to control both the heating elements and the smoke generator. Yes, we could even smoke a bit, cook for a bit, then smoke for a bit.

Additional parts will be used of course, but I’ll raid those from my standard stock. Oh, that includs a AD595 chip for reading the temp of the thermocouple. There are nicer newer chips, but it’s reliable and through hole mount. And I’ve already got it.

The basic design is here:
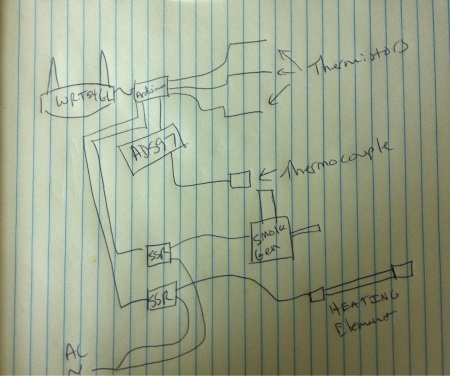
And a few more resources:

Here’s a similar project, but stand alone (no router)

Cheap Wifi Thermostat with a JSON API

9 April, 2012 (08:08) | hardware, iPhone, networking, Toys | 10 comments

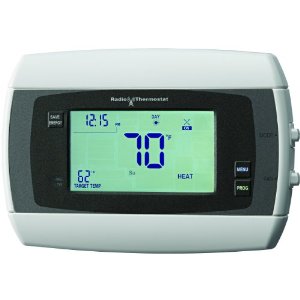
I updated my thermostat to one of these. It’s made by Homewerks (Home depot sells a filtrete branded version.) It’s not as cool as the NEST, but it’ll do the job of controlling a furnace/AC. The interesting part of this device is that the wifi interface can be cloud managed, making it possible to control the thermostat via my iPhone, iPad (or android) from anywhere with data connectivity.

It’s actually a fairly decent device for the money. It has a JSON api that allows you to get and set variables via web interface. There’s a fantastic PDF on the API that shows examples using curl (available on linux, mac, etc). What’s really interesting is that with a JSON interface, you could easily write your own application for mobile phones or just script up some commands from your choice of computing platform.

Wiring was interesting. On my ancient furnace (built by chrystler) I discovered some new details. The fan wire wasn’t connected at all! At some point, some A/C tech had installed a honeywell fan controller and the fan is activated by either the cooling or heating wires being engaged. (there is a manual switch inside the furnace. Argh!) However, I was able to re-use the fan wire as a C wire to deliver both sides of the 24v a/c transformer power to the thermostat. Wifi eats more power, and you need an external supply to feed that radio.

Setup is pretty neat. I loaded the radio thermostat App on my iPad, and once it discovered the thermostat, I had to join the ‘stats wifi network. Then I could configure my WPA2 network (excellent! Thanks for supporting proper protocols!) as well as a dynamic or static ip address. I opted for static the last time I configured it. –I reconfigured it a few times while I played around with wiring options.

The hardware in the device is rather interesting. It’s the first one I’ve seen with a wifi USNAP module. I’d expect to see more of these devices on the market. The price point is fairly low and the curl api is ideal. Hmm, arduino USNAP shield, anyone?

Resources:

Wiki (unknown owner) for developing: http://central.isaroach.com/wiki/index.php/Main_Page

PDF Documenting the Thermostat API. (local copy here) This is the interesting one.

Amazing engineering – ebikes gone wild

10 February, 2012 (08:21) | Electric Vehicle, hardware, Motorcycle | 4 comments

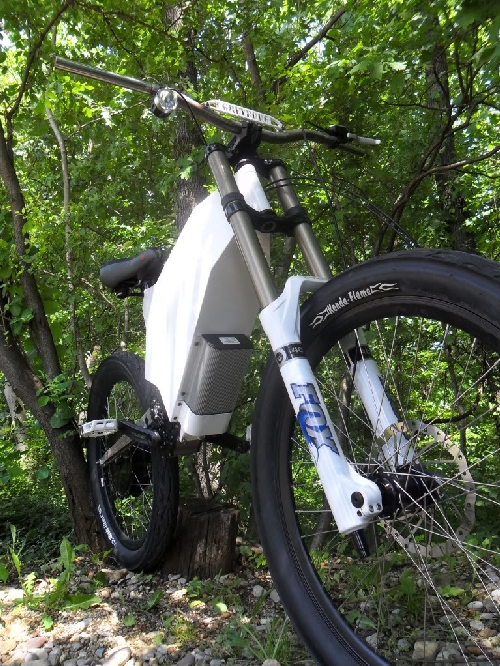
Recently I started working on an electric bicycle. Financially they’re quite viable and the performance you can get out of today’s batteries is finally worth the effort! In my research, I ran across a build log by a interesting fellow named greyborg. He makes custom bikes (in Croatia I believe) and has done some steller work:

This is his hand built version of a Stealth Electric Bike (Those start at $8k each!). Check out his build logs for this bike here and here. He even made the hub motor. The chassis is laser cut steel that he welded together and it’s powered by a custom pack of LifePo cells. Given the motor and voltage, this bike is capable of something like 50-60mph!

Be sure to check out part 2 which details the friggin liquid cooled motor, internal temperature monitoring and some huge phase wires for the brushless motor.

After I’d read this build – and was just amazed by it, I found out that Greyborg is actually a serious Ebike manufacturer who produces and sells motors, bikes and other parts. (Which explains the resources he could put into the build) I have to say that I definitely admire this guy. If he didn’t live on another continent I would take a road trip just to meet him and check out his creations!

OSX System failure: argh!

27 December, 2011 (09:48) | Uncategorized | 3 comments

It was bound to happen. My Mac Mini started to crash, and hard. When I’d login, it was a crap shoot until it would lock up. Eventually it started happening immediately after login! It’s about 1 year old and I could have sent it off to apple. Being me, I decided to do a fresh lion install on a new hard drive and see if it was actually a hardware issue or just a drive/software issue. After the install, I booted up and ran perfectly on a USB connected hard drive.

I had no problems copying my data off the old system drive. This is rather interesting… However I have a suspicion. I have seen rather ugly issues with device drivers lately – I highly suspect that the usb serial drivers I’d installed under snow leopard were causing issues under lion. I’m now slowly re-adding my software and drivers (half in fear of running into the same issue again).

Meanwhile, I did take a few steps to ensure that I can recover things. Sure, Lion has a new recovery system but I don’t want to download it for install each time. I used a trick that my server admin buddies told me about – create a second partition (say, 8Gb at the tail of your drive) and use disk utility to restore the system install iso/dmg/etc to that partition. Now you have a hard drive speed install disc that can’t be lost (unless your drive totally eats it).

Replacing the drive wasn’t quite trivial, but after a trip to Sears for a new set of mini-torx (I needed a T-8) I didn’t have any issues swapping the drive. To pop the mini logic board, I used a pair of dremel tool bits rather than hunt down the tool. Thanks for the tutorial ifixit.com

And the drive? I had a 500gb western digital blue that I’d picked up a few months ago for another project. Glad I got it!

« Older entries

 Newer entries »